Wonderdraft comes with many pre-installed assets, but sometimes you just can’t find something that your map really needs. Adding community-made assets can solve this issue, as there are literally hundreds of assets for you to download. In this article, I will lead you step-by-step on how to add assets to Wonderdraft.
To add assets to Wonderdraft, create a folder inside the assets folder in the Wonderdraft user folder. Inside the new folder, create a sprites folder, and inside it create folders for the type of asset to add (land, trees, etc.). Finally, copy and paste downloaded assets into designated folders.
The process of adding assets also slightly varies by the operating system (OS) your computer is running, so step-by-step instructions are helpful. If you want to know how to add assets to Wonderdraft in any OS and see step-by-step instructions, you should read through this guide!
How To Manually Add Assets to Wonderdraft
Table of Contents
There are two ways to add assets to Wonderdraft, manually and using Mythkeeper. I will cover Mythkeeper down below, but currently, it’s only compatible with Windows. That’s why I will cover manual installation first, which works on every OS.
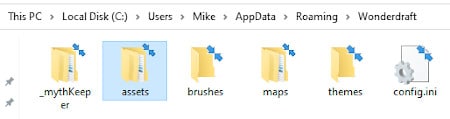
1. Locate The Wonderdraft User Folder
The first step is to locate the Wonderdraft user folder, which you can do by following these paths depending on your operating system:
- Windows: C:\Users\<User Name>\AppData\Roaming\Wonderdraft\assets\
- MacOS: /Users/<username>/Library/Application Support/Wonderdraft/assets/
- Linux: /home/<username>/.local/share/Wonderdraft/assets
If you’re having problems locating this folder, refer to the OS-specific sections down below.
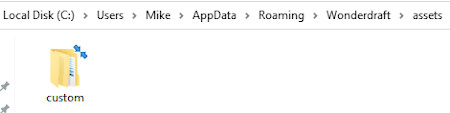
2. Create The Custom Assets Folder
Inside the assets folder, create a new folder for your custom assets. The name doesn’t matter, because it won’t appear in Wonderdraft, but I recommend naming it something like ‘custom‘ for easier navigation later on.
3. Create The sprites Folder
Inside your new folder (I will call it custom from now on), create a new folder and name it sprites. Now it’s necessary to name the folder exactly this because otherwise, Wonderdraft won’t be able to locate the assets.
4. Create The symbols Folder
Inside the sprites folder, create a new folder and name it symbols. Here is where you will install all assets that can be used with Symbols Tool. To add the assets, simply copy the asset folder you’ve downloaded and paste it inside the symbols folder.
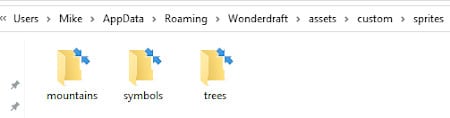
5. Create mountains Folder
To add assets for the Mountain Brush tool, create the mountains folder within the sprites folder, and copy-paste your mountain assets to the mountains folder.
6. Create trees Folder
For assets used by the Tree Brush tool, create the trees folder within the sprites folder, and copy-paste your tree assets to the trees folder.
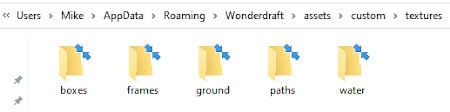
7. Create textures Folder
Now for your texture, box, frame, and path assets, you have to create a new folder in the custom folder. Name it textures, and inside it create separate folders for the rest of the asset types used in Wonderdraft:
- boxes – for box assets used by the Box Tool
- frames – for frame assets used by the Frame Tool
- ground – for landmass textures
- paths – for path assets used by the Path Tool
- water – for water textures
Inside each of these folders, you can copy-paste relevant assets as you would with previous assets.
8. Create fonts Folder
Finally, if you want to use fonts that are not available in Wonderdraft, you have to create the fonts folder inside the custom folder. To add fonts, copy-paste fonts in TrueType (.ttf) format.
Locating the Wonderdraft User Folder in Windows 10/11
The Wonderdraft user folder in Windows is located in this path:
C:\Users\<User Name>\AppData\Roaming\Wonderdraft\assets\
There are three ways of locating it:
- Type %AppData%\Wonderdraft in the search box on the taskbar and click on the folder in the search results
- Open Wonderdraft, and click on “Open User Folder” in the menu. It will automatically open the required folder.
- Open File Explorer, type in %AppData%\Wonderdraft in the address bar, and press the enter button on your keyboard
Locating the Wonderdraft User Folder in macOS
If you’re using macOS, Wonderdraft user folder is in this path:
/Users/<username>/Library/Application Support/Wonderdraft/assets/
You might have difficulties locating it because the Library folder is hidden by default. If you’ve never entered Library before, you have to unhide it first. There are two ways to do it:
- Open a new Finder window
- Open Home folder
- From the menu, click View and then Show View Options
- In the window that just opened, check the “Show Library Folder” box
Another way utilizes macOS shortcuts:
- Press Command+Shift+H on your keyboard
- Press Command+J
- Check the “Show Library Folder” box in the View Options window
Locating the Wonderdraft User Folder in Linux
To add Wonderdraft assets on Linux, you have to follow this path:
/home/<username>/.local/share/Wonderdraft/assets
You might have difficulties locating it because the .local folder could be hidden. Unhiding it depends on the exact Linux desktop environment you’re using, but in general, you will have to enter your file explorer and select “Show Hidden Files” in the “View” tab of the menu.
Mythkeeper – Wonderdraft Asset Installer
If you don’t want to bother manually installing assets, you can download Mythkeeper, which is a community-made Wonderdraft asset manager that automatically installs assets. It has a nice user interface (UI) that makes adding new assets to Wonderdraft as easy as it gets.
All you have to do is to load the .ZIP file of assets, and Mythkeeper will take care of the rest. It’s completely free, but currently only works on Windows. However, the developers are working on both, macOS and Linux versions.
Here’s a full list of Mythkeeper features:
Full Installation Support
Mythkeeper can install all types of Wonderdraft assets, including symbols, themes, and brushes. It even supports asset pack installation, meaning it can install several asset packs in one .ZIP file all at once.
Non-blocking Actions
You can keep using Mythkeeper while it installs Wonderdraft assets in the background.
Real-time Filters
You can sort your assets using many filters, which makes keeping track of your asset collection easier.
Profiles
Mythkeeper allows you to create separate profiles which you can load with different assets. For example, you can have separate profiles for different purposes of your maps, or separate them by thematics and aesthetics.
Depending on which assets you need, you can turn on a specific profile, so you will only see the assets in that specific profile when you use Wonderdraft.
No Registration
There isn’t an account system, so you don’t have to register to use Mythkeeper. Simply downloading it is all you need to start installing assets.
Open Source
Anyone can see and change the source code of Mythkeeper. As a result, it’s completely transparent and allows personal modifications.
Doesn’t Collect Data
Finally, Mythkeeper doesn’t track your activity or collect any data, so your privacy isn’t breached.
Frequently Asked Questions
Final Words
Adding assets to Wonderdraft might look intimidating, but the first time you do it is the most difficult one. After you create all the necessary folders, the process is quick and straightforward. If you want to find some assets to add, check out my post about some of the most popular Wonderdraft asset packs out there!
If you’re looking for general information and an introduction to Wonderdraft, check out my complete guide! If you want to know all the info about selling the Wonderdraft maps you made, check out my post about the important details!
